This foodious Recipe API Is Ready For a Test Drive
Sun, Jun 2nd
Here are step by step instructions on how to set up and use the foodious recipe API with your site.

If you want to see the API in action, you can go over to winslam.com/foodious and take the API for a test drive. There are a handful of recipes that are configured to make their data available.

Getting the Requisite Information From foodious

1. The first step is to have one of your recipes added to foodious. The easiest way to do this is to ask.

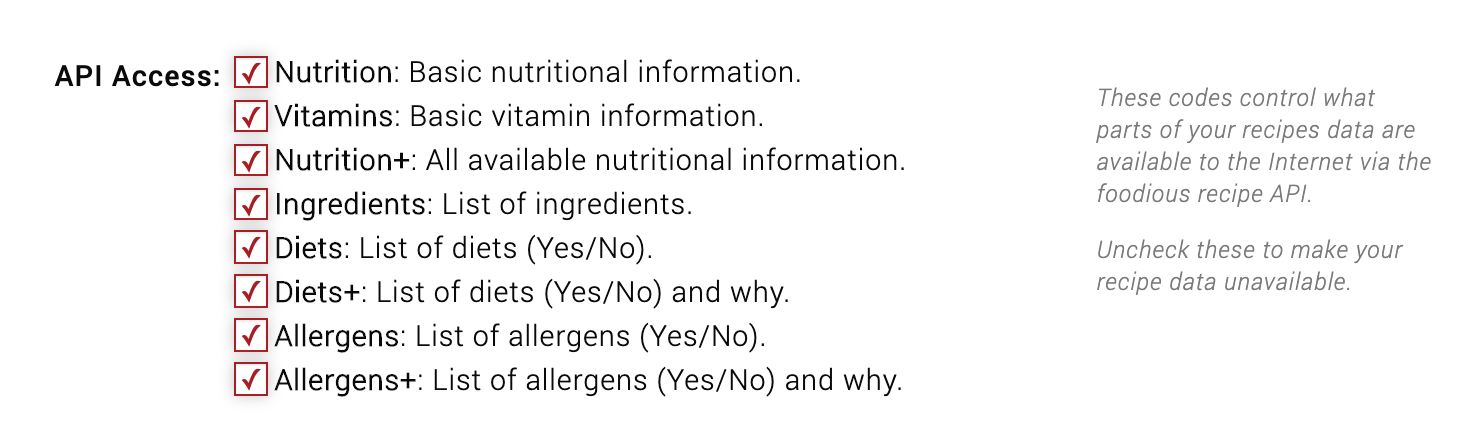
Recipes on foodious can be made private on the foodious website. This will ensure they're available via this API only for use on a Blog. Once entered, you'll need the very last part of the recipe's URL, which looks like this:

https://www.foodious.com/recipe/view/366dcf-4a211d

Also note that the foodious recipe editor allows for strict control over which datasets are available about your recipe via the API. Here's a screen capture of the recipe editor showing how you can grant or deny access to sets of information:


2. The next step is to specify what domain you'll be accessing the API from. You can obtain an API key by going here and entering your domain name. An example might be:

gopaleo.com
or
vegan-everyday.com

Once you enter the domain, the site will generate an API key for you, which will look like so:

3a710771003bdfeec7d3ccb03f597884d168a28d2acb800e3f5106611bd9781e
 
Getting Your Site Set Up

3. Add the foodious Javascript include to your site:

<script language="javascript" src="https://j.foodious.com/js/foodious.api-1.js"></script>

NOTE: The foodious API depends on jQuery.


4. Add the foodious CSS include to your site:

<link rel="stylesheet" type="text/css" href="https://c.foodious.com/css/api/foodious.api-1.0.0.css">

... or just look at the file and implement the handful of styles (approx. 20).


5. Add a DIV on your site for where you'd like the nutritional information to appear. This will look a lot like the following:

<div id="foodiousData"></div>
 

6. Add the following Javascript to the "document.ready" section of your page:

// Your recipeId, API key, and domain
var _recipePuid = '366dcf-4a211d';
var _strApiKey  = '3a710771003bdfeec7d3ccb03f597884d168a28d2fbd9781e';
var _strDomain  = 'your-domain.com';
 
// The sections you want to display are "true", the rest are "false"
foodious.init();
foodious.fetchConfig( 'nutrition',   true  );
foodious.fetchConfig( 'vitamins',    true  );
foodious.fetchConfig( 'ingredients', true  );
foodious.fetchConfig( 'diets',       true  );
foodious.fetchConfig( 'allergens',   true  );
foodious.fetchConfig( 'diets+',      false );
foodious.fetchConfig( 'allergens+',  false );
 
// The Id of the DIV for the data to display
foodious.displayConfig( 'divId' ,"foodiousData" );
 
// The number of columns: 0 (for list view), 1, or 2
foodious.displayConfig( 'numCols', 0 );
 
// Go dogs go!
foodious.go( _recipePuid, _strDomain, _strApiKey );
Back To Blog Entries List
©2017-2024 foodious LLC
We use cookies to improve your experience on this site. To find out more, read our privacy policy.  Okay